Easy Bokeh Setup
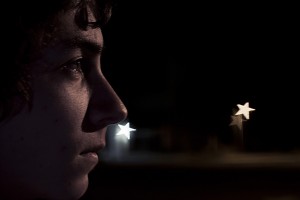
There have been a lot of posts in the last year about creating photos with custom shaped “bokeh” or circle of confusion. For those unfamiliar, that’s basically the way a photo blurs in the background. Turns out you can control the shape of the blur, and it works nicely with lights in the background. I wanted to try the technique recently, and started to think about building one of the fittings described in various DIY articles, when I realized I had a much simpler and more elegant (to me) solution already at hand. The homemade versions I’ve seen online consist of making a fitting out of black paper that goes over the lens. They all work great, but anything like that would be crushed in my backpack… err, camera bag.
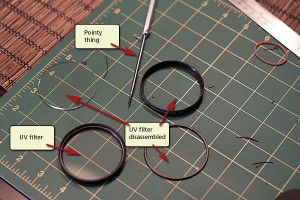
Over the years I’ve somehow acquired a few sets of inexpensive lens filters – they’re often thrown in with kit packages of various types that online retailers promote. I had two identical unused Zeikos filter sets from who knows where, so I opened them up to see if I could figure out a way to make use of them. Luckily, it’s super easy. Here’s what I used:
- Two UV filters – one stays intact, the other gets disassembled
- Heavy black paper or plastic to cut the shapes out of
- A fairly strong pointy thing – a small screwdriver should work fine
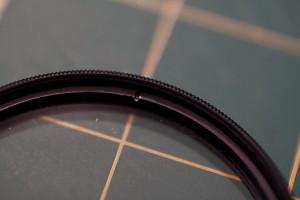
These filters are made up of three parts: An outer ring, the glass, and an inner ring that holds the glass in place. The inner ring screws into the outer ring. If you look closely, you’ll see a notch in the inner ring. I used my pointy thing to turn the inner ring to unscrew it. The first filter wouldn’t budge, but the second one turned easily. You have to hold the filter gently as you unscrew the inner ring, because the rings are delicate. You could easily bend them out of shape once the glass loosens up.
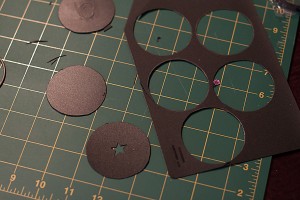
You only need the complete filter and the outer ring from the disassembled filter. Next, I used the outer ring to trace circles onto my black plastic sheet (I used a report cover – the type sold at Staples or Walmart for a couple of dollars). I traced inside the widest part of the ring. The circle you cut out needs to fit inside the ring, but be large enough that it doesn’t fit through the ring, since the ring will hold it in place. Before cutting out the circles I drew a few shapes in the center of the circles and cut them out with an X-acto knife. These shapes will be the shape of the bokeh in the photos. Once I had the center shapes cut out, I cut the circles out with scissors.
The size of the shape is important. If it’s too big, the shape will not be clear in the photos. I’m not positive, but I suspect the ideal size depends on the lens you’re going to use it with. I made mine for a Canon 50mm f1.4, which gives you a nice wide opening to work with. The star shape in the picture above is about 8-9mm (a little over a half inch) at its widest point, and that seemed to work pretty well. I made an arrow shape that is about 13mm (almost 1 inch) at its widest point, and that blurs out too much.
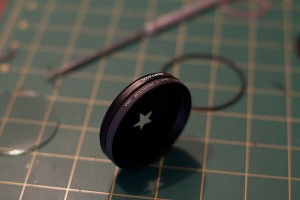
Once you cut out your shapes, put one of your circles against the glass in the intact filter, and use the outer ring from the disassembled filter to lock it in place. The whole thing then gets attached to your lens like any other filter. It can be slightly tricky to get the cutout shape to point the direction you want. I’m thinking of adding a small duct tape handle to make it easy to rotate the shape once it’s on the camera. You just have to loosen the outer ring slightly so the shape can move freely. Here’s the assembled unit:
And here are a couple of samples…
